

- Actual fastener size - over 35% smaller than any other basting tacks.
- Easy-to-use tool saves time on basting and more.
- Small, extra-fine needle is gentle on fabric.
- Makes quick clothing repairs simple.
- Tiny micro fasteners can be sewn over.
- Fasteners can be easily removed with a quick pull or snip.
- Durable metal feed mechanism.
- No batteries required.
Compatible Fasteners Include:
11/64" (4.4mm) White Micro Fasteners (11172-0)
11/64" (4.4mm) Black Micro Fasteners (11173-0)
11/64" (4.4mm) Black & White Micro Fasteners (11186-0)
14/64" (5.4mm) White Micro Fasteners (11184-0)
14/64" (5.4mm) Black Micro Fasteners (11185-0)
Compatible Needles Include:
11215-0 (1 needle in a package)
11041-0 (4 needles in a package)
- US Warranty 2 Years Limited Warranty on defects in materials and workmanship.
- Non-US Warranty: 30 days parts and labor
- Hemming
- Garment repairs & tailoring
- Attaching sequins
- Adjusting a necklace
Crafts
- Basting patchwork quilts
- Shadow box framing
- School projects
- Tacking appliques
- Decorating gift bags
Home Projects
- Adjusting a dust ruffle/bed skirt
- Repairing or shortening a sofa skirt
- Decorating for the holidays
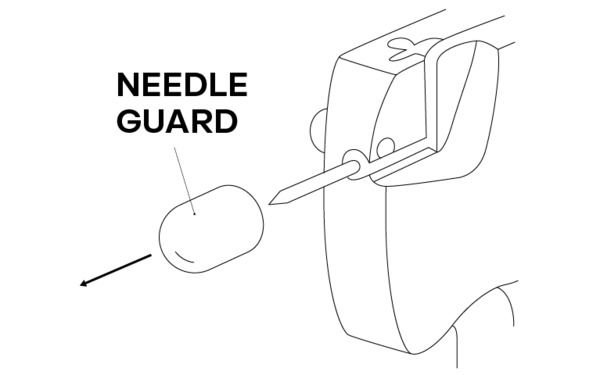 Removing the needle guard
1. Remove protective needle guard before using.
2. ALWAYS cover needle with guard when tool is not in use.
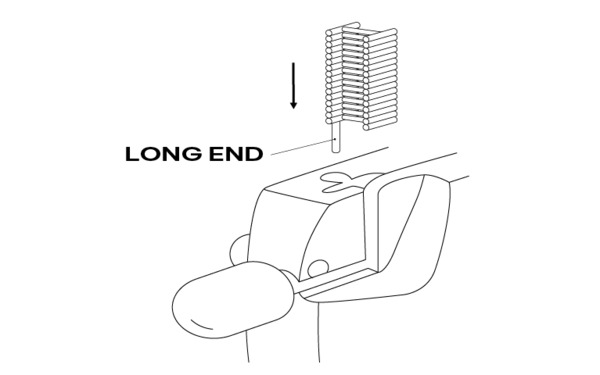 Loading micro fasteners
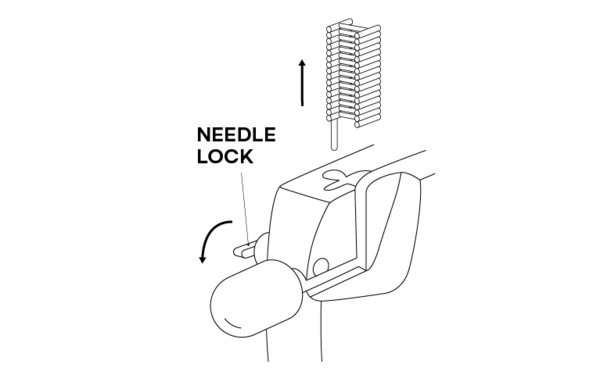
1. Insert the long end of the round connecting bar on the micro fastener clip into the round guide slot at the top of the tool.
2. Gently push the micro fastener clip into the guide until it “clicks” in place. Be careful not to distort the individual fasteners. The tool is ready for use.
 How to remove a partially used clip
1. Squeeze the trigger all the way.
2. Pull the clip out of the round guide slot.
3. Release the trigger all the way.
4. Check the partial clip for damage before re-loading.*
*Always discard clips that have micro fasteners that are out of place, distorted or damaged. A damaged clip can cause feeding or jamming problems.
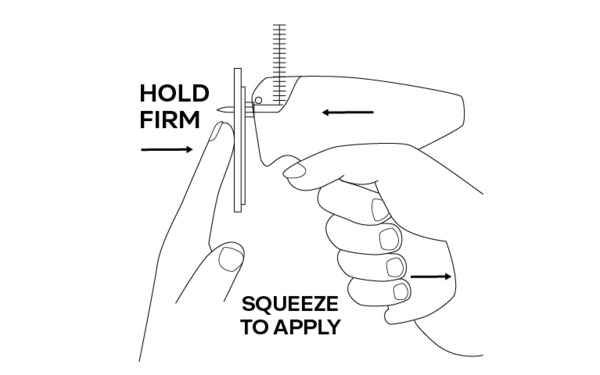 Inserting micro fasteners
1. Push the needle of the tool through the items to be attached.
2. Hold the material firmly against the front of the tool and squeeze the trigger completely.
3. Release the trigger.
4. Withdraw the needle and tool from the material.
5. Material is now securely attached.
6. Always use the needle guard when the tool is not in use.
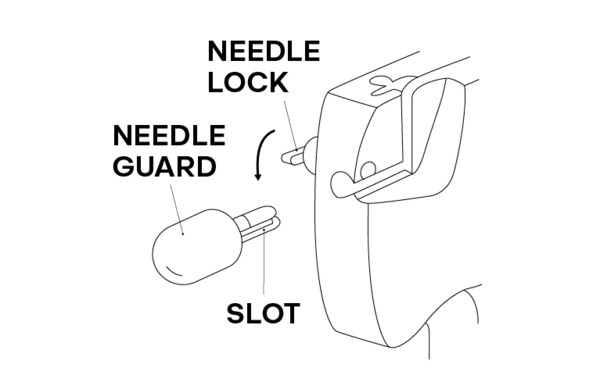 Installing & removing needles
To install the needle:
1. Place the needle, point end first, into the needle guard.
2. Turn the needle lock towards the front of the tool as shown.
3. Insert the needle with the needle slot aligned with the slot in the tool.
4. Once in place, turn the needle lock 180° back towards the rear of the tool.
To remove the needle:
1. Place the needle, point end first, into the needle guard.
2. Turn the needle lock towards the front of the tool as shown.
3. Slide the needle out of the tool.
 Helpful tips
• Make sure needle is pushed all the way through fabric.
• Keep layers smooth and flat while fastening.
• When basting a quilt, use a basting grate or quilting hoop for fabric support to eliminate the need to put your hand under the quilt.
• To remove the micro fasteners, use blunt-pointed scissors, cuticle clippers, or a quick pull with your fingers.
D11173 11/64" (4.4mm) Black Micro Fasteners,
Compatible Needles: D11041 (4 needles in a package)
