 |
February 22, 2025 |
AllBrands Repair Service Portable Sewing Serger Quilt Embroidery Machines Minimum Charge $199.99 Mech, $299.99 Electronic, $399.99 Ind/Comm+Parts/Ship
 33263: AllBrands.com Repair Service |
Availability: Advance Orders Only. Please review the product description for complete details. Condition: Retail |
Features

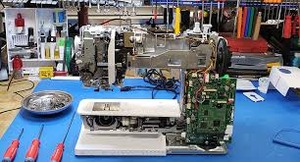
Allbrands.com has over 70 years of combined factory-trained mechanics experience in servicing portable sewing, serger, quilting, and embroidery machines. We now have premium professional repair services available on your sewing machines in-store or by mail.
For Portable Mechanical Sewing Machines without any electronics on board Minimum $199.99 Charge +$25 for Return Ship +Parts and Installation Labor. Minimum $299.99 charge for Portable Computer, Embroidery or Serger machines. Minimum $399.99 plus Freight for Multi Needle, Industrial, or Longarm machine heads. (do not send stands)
We are the Sewing Machine Doctors with a motto of Fix it Right The First Time with a warranty of 30 days on mechanical and electronic adjustments, not recleaning.
.
We Service AllBrands of Portable Machines: Brother, Babylock, Bernina, Elna, Juki, Kenmore, Necchi, Riccar, Pfaff, Singer, Viking, White, Simplicity.
Your sewing machine is your baby. We want to help you ensure the best quality stitches on your sewing, quilting, embroidery, or serger machine, that are well adjusted and running smoothly!
Review our simple 3 step process below to get started! Or, Click HERE to Email Attn: [email protected] or general mailbox Attn: [email protected] if you have any questions or want to send pictures, prior to placing your order
Mail-in or Ship in Service Plan for all portable home sewing and embroidery machines. Here is how the program works.
*$199.99 +25.00 Return Shipping Cost if mail order: on Basic Mechanical Portable Sewing Machines.
*$299.99 +25.00 Return Shipping Cost if mail order: Computerized Sewing, Embroidery Machines,Sergers, Portable Blind Hem Machines.
*$399.99 +Pallatized Freight Return Shipping Cost if mail order: on Multi Needle Embroidery, Industrial Sewing Machine Heads, and Long Arm Quilting Machine heads.
Step 1. Purchase the 149.99 dollars minimum charge repair service above plus 25 dollars added for our prepaid and insured return shipping costs in USA 48 States. $100 Upcharge for Electronic, Embroidery or Serger. $200 upcharge for Mulit Needle, Industrial, or Longarm Quilting Machines. We will email you an Authorization Number to put on the outside of the box for easy identification.
Step 2. Ship your machine insured to Allbrands.com, Attn: Service Department, 20415 Highland Road, Baton Rouge, La. 70817. Pack in original carton with all styrofoam and double boxed, or wrap in 5" of heavy bubble wrap and double boxed. Include your foot control, bobbin case, bobbin, power cord, thread, needles and fabric samples, hooped fabric with stabilizer, copies of any prior repair tickets, printouts of our email communication, order confirmation, and any written documents regarding the sewing problems you are having with your machine.
Step 3. We will service and ship your repaired machine back pre-paid and insured. If mechanical adjustments or parts are needed, our mechanics will email or call you for approval of estimates above our minimum service charges. Our charges includes removing covers, cleaning, oiling, replacing covers, and balancing thread tension in sew off. Our average repair bill includes and average of 2 mechanical or electronic adjustments
If your machine cannot be repaired or you do not want to pay for any additional parts or installation required,
the 25 dollar prepaid shipping charge will be used to return your portable machine to you un-repaired.
Why do I need to have my sewing machine serviced?
There are many moving parts in a sewing machine and if it moves, it needs lubrication. These days many of the moving parts are housed with computer circuit boards and wires around them. Our Sewing machine technicians are factory trained to maintain and service computerized sewing machines.
For best performance and years of sewing, our technicians suggest you have your machine serviced annually. Below is our 24-Point Tune-Up Checklist and a list of Sewing Machine Performance Tips that our technicians suggest between services.
Sewing Machine Performance Tips:
Keep your machine covered when not using it. Household dust, lint and pet hair can enter your machine in one of it's many openings causing all types of problems.
Keep your machine away from direct sunlight, high/low temperatures and humidity.
Use the right needle for your project and change your needle every 3 to 4 hours of sewing or after every other project. The needle is the major culprit for most sewing problems.
Use good quality thread.
Use bobbins made specifically for your machine and make sure your bobbin thread is wound tight and no loose threads are hanging.
DO NOT SEW OVER PINS! Your needle may break, you could damage the hook or pieces of the needle could fly up into your face.
Do not use canned air on your machine or blow into your machine. The lint is just being pushed further into the machine and you are spraying moisture into your machine which can cause corrosion or damage your circuit boards
Clean the bobbin area frequently. Refer to manual for instructions.
Have a 24 Point Inspection completed, at a qualified repair center, on your sewing machine once a year to keep it performing like new for years to come.
Extended US Warranty: 30 Days labor on defects in materials and workmanship.
Non-US Warranty: 30 days parts and labor.
Specifications
24-Point Tune-Up:Below is a checklist all technicians complete, if applicable, with every 24-Point Sewing Machine Tune-up performed.
Check Bobbin Winder Mechanism
Inspect Cam Followers & Spacers
Clean Take-Up Lever
Clean & Lube - Pendulum Swing Mechanism
Check Spool Pins, Felts & Caps
Adjust Needle Bar Height
Check Light Bulb
Acuate All Levers & Knobs
Deburr Needle Plate
Polish Hook
Check Timing (Hook & Feed)
Inspect Feed Dogs & Adjust
Clean Bobbin Case
Adjust Bobbin Case Positioner Bracket
Inspect Gears
Check Linkage Bearings & Sleeves
Test Motor Blocks and Pivot Connections
Adjust Motor Belt & Inspect
Check Timing Belt for Wear
Test Tension Knobs & Springs For Torque
Electrical Cords Inspection
Inspect Foot Control Wear
Clean Exterior & Polish
Test Sew On Demo Fabric
Below is what we are taught by sewing machine manufacturers
Completely disassemble sewing machine
Clean out all lint and debris
Degumm and remove old oil and grease
Apply new oil and grease
Check and adjust/reset over 30 settings
Polish all areas in thread path, hook, bobbin case, needle plate, presser foot etc..
Check for any updates update as needed
Reset service programs and calibrations
Balance tensions
Sew it out and fine tune as needed
Then clean exterior of machine
See Videos on maintenance below!
Pinterest.com Maintenance for Sewing Machines
Nancy Zieman Video on 6 Techniques for Sewing Machine Maintenance
Click HERE for Sewing Machine Maintenance Tips from Cooperative Extension Service, New Mexico State University
Click HERE to Email Attn: [email protected] or Attn: [email protected] if you have any questions prior to placing your order
Click HERE for You Tube videos on Home Sewing Machine Maintenance, so if it something simple that you can do at home, it doesn't need to go to the shop
Click HERE for You Tube videos on Home Sewing Machine Repair, so if it something simple that you can do at home, it doesn't need to go to the shop

Click HERE for Zen and the Art of Sewing Machine Maintenance7 Steps To Peak Performance For Your Sewing Machine from Fix Sewing Machine Institute
7 Steps To Peak Performance
For Your Sewing Machine from Fix Sewing Machine Institute
See You Tube Videos on Sewing Machine Repair
Although using a Bernina 1008, most of the information applies to most sewing machines. All sewing machines do better with a little bit of ‘TLC’. Just a bit of a clean up and a drop of oil every now and then does wonders. Keeping your sewing machine clean and lubricated will reduce the wear and tear and keep everything running smoothly.
mizsparrow: How a sewing machine hooks threads into your fabric, on underneath oscillating shuttle sewing machines
Quick Guide for Sewing Machine Top Tension pdf by Cindy Needham
DIY: Cleaning Your Vintage Sewing Machine
Sewing Machne Maintenance Tips | National Sewing Circle. Jessica Giardino provides extremely beneficial tips on how to perform maintenance on your own sewing machine. Learn how to make repairs to your machine at home to save money and stitch happily. Find out how often you should perform maintenance on your machine as well as what tools you may need to help clean your sewing machine.
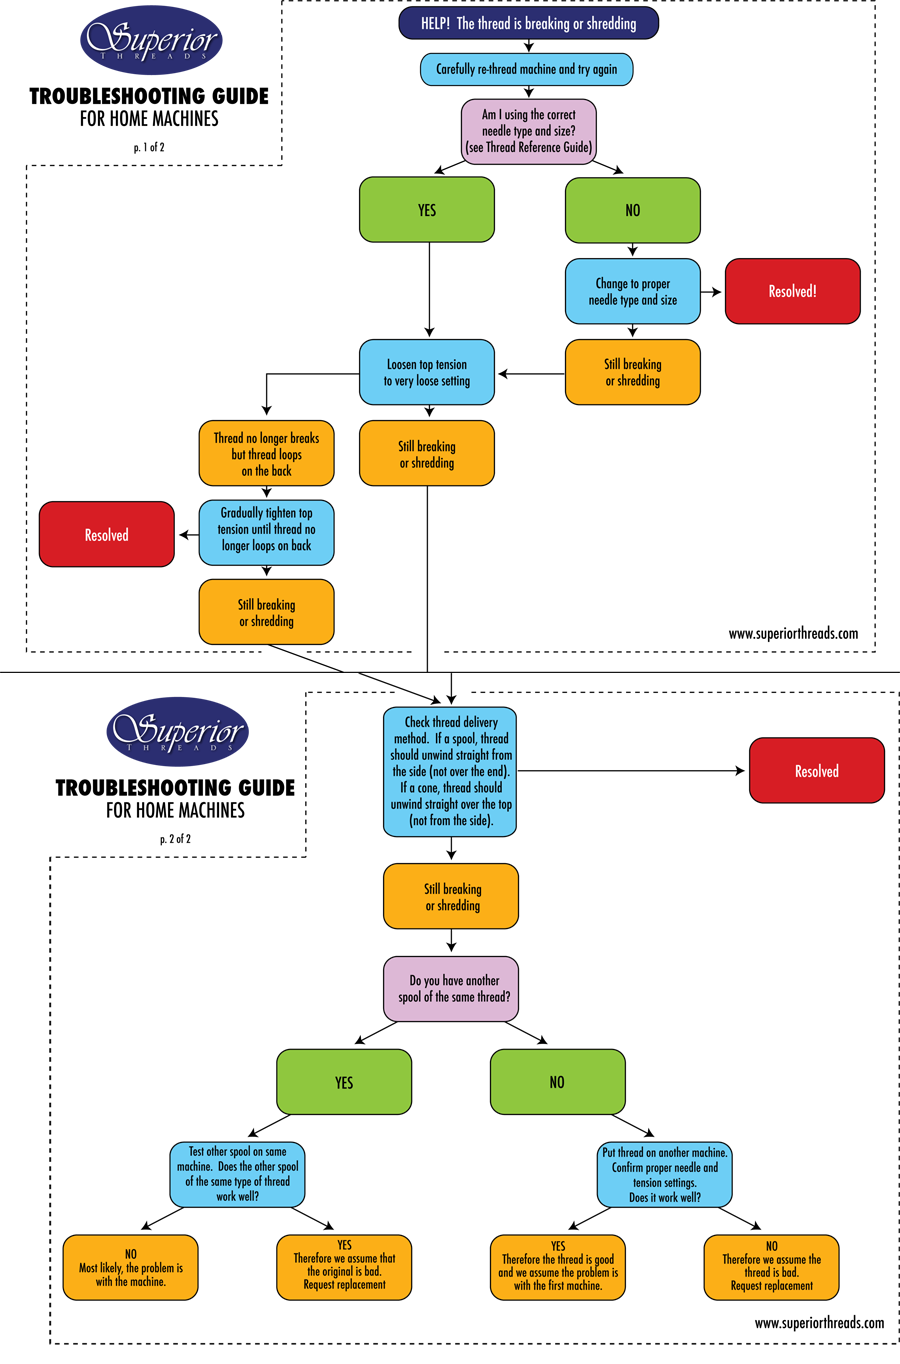
Singer Blog on Troubleshooting Tips
Sewing Machine Lubricants
How to Clean and Oil Your Bernina Sewing Machine.Did you know you need to oil your Bernina sewing machine every 3 - 5 bobbins? You do! To many people neglect oiling their Bernina sewing machine or even worse have been told NOT to oil their sewing machine.
Bernina We All Sew Blog on How to Clean and Maintain Your Sewing Machine
Bernina ACHINE MAINTENANCE FREQUENTLY ASKED QUESTIONS: CLEANING AND OILING
Bernina Users - THIS IS NOT LINT! ***DO NOT REMOVE***
Video Tip: Avoid Thread Bird Nesting from Top Thread balling up underneath the fabric
15 Reasons Why a Sewing Machine Needle Breaks by Sewing Mastery, Heirloom CreationsA sewing machine needle can break for a variety of reasons. Sometimes it is operator error and sometimes it can be the wrong needle for the fabric. If you have experienced a rash of broken needles within a short amount of time, see if one of the following situations relates to you and learn how to overcome the problem.
Thread Catches on the Spool
Some thread brands have these lovely thread holders notched in the edge of the spool. Handy, yes, but if the thread spool is laying on its side it can catch in the groove, pull the thread tight and SNAP the sewing machine needle. To avoid this, be sure to stand this type of thread up using a vertical thread pin.
Thread Wraps Around the Spool Cap:
For threads that need a horizontal spool pin and a spool cap to hold them in place, the thread can get caught between the thread spool and the cap. Though a spool cap is necessary to keep the thread in place, it must be pushed into place so there is no gap for the thread to catch between the two. This is one of the reasons I prefer using a thread stand.
Whitening Your Yellowed Vintage Sewing, Serger, Embroidery, Quilting and Knitting Machine Plastic ABS Parts! (RetroBrite) This is a video demonstrating how I have whitened some ABS plastic pieces of a vintage knitting machine that had become yellow with age and exposure to UV light. This is the RetroBrite procedure, which you may have seen being used on old video game consoles, sneakers, computers, and other older ABS plastic products. Works very well, is inexpensive, and really helps restore these old beauties to their former glory.
Machine Maintenance with Gary | Echidna Sewing
How to oil your sewing machine needle bar, prevent costly repairs DIY simple fix drop in bobbin case. Jeff shows on Brother made Babylock Destiny
How to Remove Thread from the Take-Up Lever & Remove Fabric Stuck in the Needle PlateHave you ever started sewing and the thread pulled out of the needle? Doug shares how to fix this common issue so you can return back to stitching. Plus, learn how to remove fabric that gets stuck on the machine after you have completed sewing.
Singer Sewing Tips 101: Maintenance and TLC
Sew Steady SST Portable Sewing Machine Flatbed Extension Table 11.5" up to 24" Wide by 15" up to 32" Deep for Freearm or Flatbed Machines, 6 Sizes
 3522: Sew Steady SST Portable Extension Table 11.5 to 24" Wide by 15 to 32" Deep. *Accessories (Spinner Tray and Sew Straight Guide) sold separately |
Our Price: $99.99 Prices are subject to change, and only current prices will be honored. Availability: Custom cut to fit your exact machine. Usually leaves the warehouse in 2-5 weeks Condition: New In Box |
Features
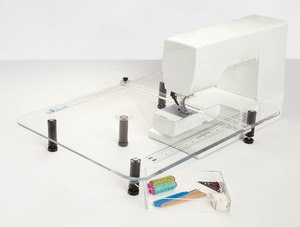
Made in USA, Includes Acrylic Surround Freearm Platform and Adjustable Height Legs, Custom Fit Portable Freearm Extension for Flatbed Workspace Use, Order for your model Sewing, Embroidery, Quilting, Serger, and BlindStitch Portable Machines. Steady has the dimensional data on all brands and models of sewing machine free arms for custom cutouts on extension tables and cabinet inserts on their CNC laser cutting machines. If you need a non standard table or insert (no existing data available on machine or cabinet) please contact Sew Steady direct at SewSteady.com for a quote.
We do not keep stock on hand for any of our Tables or Inserts as they are all made to order.
The Table should be received in no more than 3 weeks from the day we receive the order. Sew Steady
"It is much better than the extension table that came with the sewing machine." Jimmy L, LA, CA.
"One of the best inventions since the automobile!" Cheryl H, McKenney VA
"Wow!! I absolutely love my new extension table! And if it weren't for me looking for a part i needed i would have never known it existed !! I stumbled on your site and so glad i did!! So Thank you so very much you guys, it fits like a glove!!! "
Please Note:*From 12" Wide to 32" Deep* covers all six available dimensions at increased prices. Does not mean that any dimensions between 12" Wide to 32" Deep is available. Please pick from the 6 sizes available at increasing prices. Accessories shown in picture (Spinner Tray and Sew Straight Guide) are optional and sold separately.
Includes:
- Acrylic Platform
- Adjustable Height Legs
- Custom Fit Portable Freearm Flatbed, for Sewing, Embroidery, Quilting, Serger and BlindStitch Portable Machines.
- 1 year warranty.
Note: Custom Made to Fit Around the Freearm or Flatbed Surface of Your Brand and Model Sewing, Embroidery and Serger Machines. If your sewing machine drop in bobbin (top load) cover (applies to metal covers not to plastic covers) does not come straight up and off the needle plate (if it slides toward the operator) or if your bobbin case is underneath the top of the arm (front load), you will need to remove the extension table to replace a bobbin.
Sew Steady Tables are Custom Made to Fit your Model Like a Glove! Do you really need or have the extra space for a full sized cabinet with drawers? Or just more working surface around your machine?
The Sew Steady Portable Table extends the sewing surface area of your table top sewing machine. It supports fabric for even stitch quality. Tight fitting NO GAP design since tables are specific to machine model. It has easily adjustable snap-on-off legs for easy storage and travel.
A flat sewing surface provides you with the most control when sewing. If you don't have your machine mounted in a cabinet, using a Sew Steady Portable Table is the next best thing. Take it to class so you have a flat surface there, too. Adjustable legs can be removed for transport and storage. Each table is custom cut from 1/4" Plexiglas to fit your particular machine.
- Extension Table For Sewing, Embroidery Or Quilting
- Available In Five Sizes!
- Junior, Serger, Large & Big Tables include a permanent inches and metric ruler printed on the underside of the table. Giant tables come with 2 cling rulers which adhere to the underside.
- Large, Big and Giant sizes also include a movable extra support leg
- Large table works with tiltables
- Rounded front edge for comfort
- Use it as a light box and easy underneath storage
- High Quality Acrylic Construction
- Specify To Fit Around Freearm Or Embroidery Unit
-
The Sew Steady table is built-to-order to fit your specific machine. Please allow 2-5 weeks before shipping and expect a delivery time of 5-7 days. It is well worth the wait!
Demonstration video, showing table leg installation process:
Acrylic Table for Top Loading Bobbin Sewing Machine
Extended US Warranty: 1 year limited warranty on defects in materials and workmanship.
Non-US Warranty: 30 days parts and labor.
Specifications
"Custom charges are only added to items that require customization. So if a non-standard placement or an irregular size is requested, it would have a custom fee applied." Sew Steady Tables and Inserts.- Junior: 11.5" x 15" -- Sewing only. This Size is Not available for Singer 221 Featherweight, please choose 18x18 or above
- Small: 18" x 18" -- Sergers only
- Large: 18" x 24" -- Serger, Freearm or Embroidery
- Big: 24" x 24" -- Serger, Freearm or Embroidery
- Giant: 24" x 32" -- Serger, Freearm or Embroidery
- Freearm cutout fits around the freearm of your model machine for sewing and quilting.
- Can order a table without a cutout—specify "blank/no machine cutout" in the make/model section of this page.
- Embroidery cutout fits around your model embroidery unit for embroidery.
- The legs on all our Sew Steady Tables are inset from the perimeter by no less than 1”.
SEW STEADY TABLE DESIGN STANDARDS:
All of our tables are designed based on having the accessory tray removed from the machine. We position the machine to have the needle around 5”-7” from the front edge of the table. The table encompasses the entire freearm/flatbed sewing surface (does not wrap to the far-right of the machine). If your machine free arm slopes downward and has contours we may choose to design the table to hover over the slope to ensure a perfectly level, smooth sewing surface. If you have a top loading bobbin and a sloped machine this may affect your use. Please contact us in advance at SewSteady.com for other options. If you are purchasing a Deluxe Table then the holes do not need to be in line with the needle to make circles.
Please indicate the Dimensions of the Sew Steady extension table in inches:
Left to Right :________ Front to Back:_________
Make of Machine: ______________ Model of Machine: _______________
The standard position of the table placement front to back is to have the needle sit about 5-7” from the front of the table. Will this work for you? ___________
(If no, please indicate in measurements of 1/16”-increments how far from the front of the table you wish to have the front of your skinny free-arm on your machine sit)
The standard position of the table from right to left is to have the table wrap around the free arm of the machine only. Our goal is to give the sewer the most sewing space from the free arm to the left of the needle. Will this work for you? _____________
(If no, please indicate in 1/16”-increments how much Table you’d like to the left of the left/tip of your free arm to the left edge of the table)
The standard position of the table is to have the sewer positioned in front of the machine, with the needle at the left, the handwheel at the right. Will this work for you? ______________
(If no, do you plan to sew using Free Motion Technique, which would prefer you to sew at the tip of the machine, changing the placement of the cutout to be on the wider end?)
Our tables typically only wrap around the free arm of a machine, they do not typically wrap the full length to the right. Do you need your table to wrap as far to the right side of the machine as possible? __________
The table is designed to never be resting on or touching the machine. You may have to adjust the levelers on the feet to make sure the table is perfectly level with the top of the free arm in order to sit as designed. The table is designed to fit around the free arm with the accessory tray always being removed. We do make some tables that work for Embroidery and Sergers. Please let us know if you are interested in these options. We are happy to accommodate other special requests as well with proper measurements and pictures if needed. Our goal is to get you the right table the first time. If you decide you do not like the placement requested the first time, there is a $50 fee for a 2nd revision
Sew Steady 12" LED Light Stick, You Can Use USB Plug In On Your Machine or Computer to Operate
 80778: *Sew Steady 12" LED Light Stick, Can Use USB Plug In On Your Machine to Operate |
Our Price: $29.99 Prices are subject to change, and only current prices will be honored. Shipping: Free Ground Shipping to the Contiguous USA Availability: Usually leaves the warehouse in 1-2 weeks. Condition: New In Box |
Features
Notice: We are still waiting to receive our new supply of Light Sticks, currently they are scheduled to arrive this week. As long as they arrive on time, our lead time will still be 1-2 weeks to be received. Sew Steady
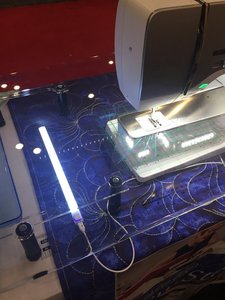
Light up your Sewing work space with this LED light stick. Operates with a USB plug use your machine to operate it or plug in to cell phone charger and other USB outlet. This can easily turn your Wish table into a Light table, can be conveniently stored in your Sew Steady Wish Drawer. Approximately 12" long and 1/2" wide.
Light up your Sewing work space with this LED light stick. Operates with a USB plug use your machine to operate it or plug in to cell phone charger and other USB outlet. This can easily turn your Wish table into a Light table, can be conveniently stored in your Sew Steady Wish Drawer. Approximately 12" long and 1/2" wide.
Extended US Warranty: 1 year limited warranty on defects in materials and workmanship.
Non-US Warranty: 30 days parts and labor.
Specifications
Click here for a flyer to download.Light up your sewing work space
with this LED light stick. Turn your
Sew Steady Table or Cabinet Insert
into a light box.
• Operates with a USB plug so you can use your
machine to operate it
• Plug in to cell phone charger and other
USB outlet
• Use on / off button to turn on / off
• Approximately 12” long and 1/2” wide
Copyright © 1995-2025 AllBrands.com.
SewingMachineStore and SewingMachineStore.com are property and trademarks of AllBrands, LLC, dba AllBrands.com. All Rights Reserved.
SewingMachineStore and SewingMachineStore.com are property and trademarks of AllBrands, LLC, dba AllBrands.com. All Rights Reserved.